I love this little number. I'd also be lying if it wasn't inspired a bit by the Snappy Toddler Top from Prudent Baby, which is also one of my favorites. Though, with this i made a thicker neckline yoke, which i prefer the look of, but seriously, who wouldn't love a baby in this outfit!!!

- You'll need :
- the Pattern- at 100% (or no scaling) it's approximately 12-18m. For largerjust add legnth. For smaller. i would probably print it at 90% for 6m, 85% for 3m.
- i made it for my tall and skinny 8.5mo, who wears 6 or 9m body suits, 12m pants (because of the length).
- approximately 3/4 yards of a fabric
- about 20in of elastic
- 7 sets of snaps.
- using the front body piece, fold the middle with wrong sides together and match up the pleat lines, do a few stitches to tack this pleat. Then do the same with the two outer pleat markings on each side, this time folding and matching up the pleat lines with right sides together. Your front top will look like this.
- split center with the center front pleat loop and pin.
- Fold the outer pleat loops toward the middle, pin
- Using the back body piece, both back pleats will be done the same, fold and meet pleat lines with right sides together. Do a few stitches to tack the pleat. Fold the pleat loops toward the center of the body piece, pin.
- On both front and back body pieces, baste across the top at a 1/8th inch seam allowance to fix the pleats in place.
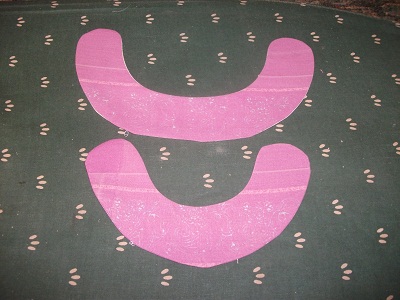
- For the front and back yoke pieces, there are 2 different ways you can complete the circular necks for both the first step is the same; starting at the markings, back stitch and stitch towards the outside of the yoke, around the top and finish (with a back stitch) at the other mark. The first way, you can clip the curves, flip it and fold/iron under the edges. The other way would be to complete it the same way that in the previous post, basting across most of the opening, clipping the curves, turning and ironing. Then seam ripping the basting edge, leaving a neatly folded over edge. Do this for both the front and back yoke pieces.
- Taking both front and back body pieces, stitch them together on both the sides at a 3/8th inch seam.
- Fold and iron the seam flat- for this I usually use my handy dandy flat iron that I’m too lazy to use on my hair.
- Hem the leg bottoms by folding it 1/4inch and iron; then 1 inch and iron. Make one row of stitches just under the hem amount. About 7/8 inch seam allowance, then again at 1/2inch seam allowance from the bottom, under it.
- Measure around the baby thigh to get the length of elastic needed per leg hole. Using a safety-pin lace the elastic through the casing we just made, tacking it down at each opening.
- To finish off the arm holes, apply bias tape around the edge, I usually prefer home made, since it’s A LOT cheaper and comes in prettier colors when you get to choose it. But I had a little left over bought stuff, so I just used that instead. Visit Dana Made It Blog for a tutorial on making and sewing bias tape.
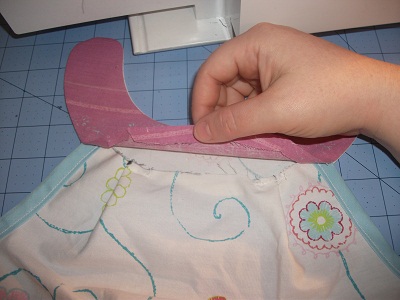
- To apply the yoke to the body pieces, insert the body piece into the appropriate yoke open that we seam ripped. (front with front, back with back). Make sure there is about 1/2inch of the body piece inside the yoke.
- Pin.Stitch across the opening to finish the top at approximately a 1/8inch seam allowance. Stitch around the entire yoke at this seam allowance. Do the same for both front and back yoke pieces
- To finish the bottom of the romper, use inseam lining pieces. Take two of the pieces and line up. Stitch around the edges at 1/2inch seam allowance.
- Clip the curve. (for this, I much prefer using my pinking shears, cutting close to the line of stitches. It provides a quick and uniform clipping).
- Flip it inside out and iron. Do the same at the previous 2 steps for the remaining two inseam lining pieces.
- Line up the inseam lining pieces with the unfinished bottom seam, there will be hang over on each side. The pieces should be lined up on the right side of the fabric. Pin.
- Stitch the inseam at 1/4inch seam allowance. Clip the curve.
- Flip the lining to the inside of the body piece. Iron and stitch at 1/2inch seam allowance.
- Apply snaps to the inseam area.
- Apply snaps to each of the shoulders. And we’re done!!!


Here are a few action shots of mine on Baby:


Enjoy!!!!